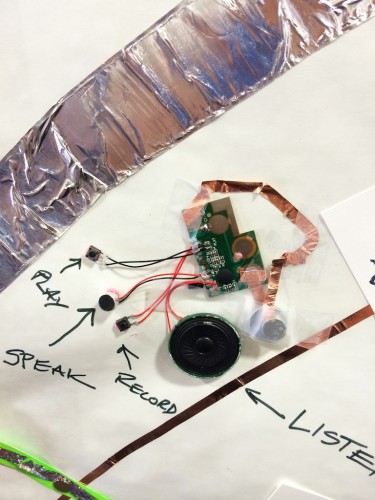
A very basic activity is to make a light-up greeting card or to “bling” out a notebook with a paper circuit on the cover. And Jie Qi, a former(?) grad student at MIT Media Lab’s High Low Tech group, who has done a bunch of work on paper circuits, has recently released a fun Circuit Stickers kit based on the ideas of paper circuitry. While Circuit Stickers are likely not feasible in a classroom setting, they would be fun to buy as toys for kids to play with at home.
Jie also is the one who created the most incredible and lovely interactive painting using paper circuits.
Interactive Light Painting: Pu Gong Ying Tu (Dandelion Painting) from Jie Qi on Vimeo.
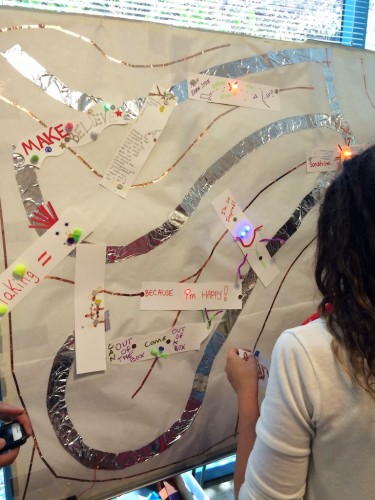
At a conference recently, I saw a fabulous application of paper circuits from the folks at the Exploratory where everyone collaborated on a paper circuit mural. The main difference here is that someone preps a large surface ahead of time with a positive rail and a negative rail (hint: use copper tape for one and aluminum foil for the other to easily tell them apart), hooks them up to battery pack(s) for power, and then gives everyone the materials to create paper circuit pieces to add to the mural. Pieces can be attached using pushpins or magnets, depending on what the backing of the mural is.

Useful links:
- Exploratorium’s Tinkering Studio‘s main project page for paper circuits has great examples, suggestions on where to buy supplies, and a PDF activity guide.
- The Tinkering Studio wrote a blog entry on paper circuits that has great tips on facilitation strategies and common challenges.
- High-Low Tech group’s site has an online tutorial and a one page handout with templates and materials list, including part numbers for Digikey, which is a cheap vendor for electronics materials.
- The fabulous Lindsey Own, who ran a workshop session on alternative circuits with Jenny Howland at the professional development event we ran back in June, has a nice blog entry with tips and tricks for working with paper circuits.
Tips & tricks:
- Any 3V coin cell batteries will work. I usually buy CR2032 because I can use them for other things too and I like that they’re pretty flat.
- For the most part, I use regular two-legged LEDs but I have since learned about using surface mount LEDs for tiny lights that lay flatter on the page or LEDs with axial leads for easier wiring.
- Copper tape can be bought from hardware stores as snail tape or EMI shielding tape from electronics stores. Tinkering Studio has some tips on which brands are best.
- Instead of taping down the leg of an LED onto the paper, first lay down a piece of copper tape. Put the leg on top and then tape that down with another smaller piece of copper tape. This will ensure that the metallic leg of the LED has good contact with the shiny, more-conductive side of the copper tape.
- As much as possible, avoid creating circuit paths with multiple pieces of tape and instead, turn corners with one piece of tape. This will ensure good current flow.
Stuff to buy:
- Batteries:
- Copper tape: Digikey 3M1181A-ND, Sparkfun 10561, JVCC (from Amazon), or Slug Tape (from Amazon)
- LEDs:
3 Comments
Love this idea! I am new to paper circuits but seeing this mural has inspired me to do a mural in our school. I will like to simulate the migration of the monarch butterflies, as part of our Day of the Dead celebration night. The idea is to create a mural (the families will paint a map of North/South America) where the community can place a paper butterfly(with an LED) that lights up. I was wondering how many LEDs I can place in one circuit if I use a 9V battery. I will appreciate your suggestions.
Oh that is such a great spin of the paper circuit mural!! I would love to see a photo!
As for your battery question, I would not use a 9V battery since most LEDs are rated at between 2-4V for voltage requirements. So either use a two-AA (which gives you 3V, since each AA is 1.5V) or three-AA (which gives you 4.5V) battery packs and that should work better for paper circuits using normal LEDs. Good luck!
This year, we just completed a community mural for the school Festival Invernal. We used 2 AA batteries for each section. Coming out with a solutions for unexpected problems was a great learning experience for the students and for me. Some of our challenges: red/yellow LEDs worked better than white/green/blue–for bigger designs (maybe because of voltage. We repurposed 2 battery packs I removed from old light strings in the classroom). Also, next time, a bigger separation between the copper tapes would work be better for placing the pieces. Thank you so much for your tips!
– Would love to share the pictures, but don’t know how to include them here.